UCCS Vision And
Software Technology Laboratory

Getting started with Mozilla Composer

Note all images herein are from a newer version of Mozilla’s Composer than being used in the lab. Concepts are all the same, images changed. Change is the only constant. Learn to deal with it.


Basic Features

Mozilla’s Composer is a graphical editor that allows you to create web sites without using HTML code. Below is a representation of the Composer workspace.
GETTING IN
Click on the Mozilla icon on the toolbar or desktop to open Composer, Choose File > New > Composer Page from the top pull-down menu. A new window will appear containing the Composer workspace.
GETTING AROUND
Like Word, Composer uses a menu, a tool bar, and shortcut keys to help users maneuver in a workspace. The menu and tool bar appear above the workspace; notes on shortcut keys appear under the menu options.
If you don't see the whole toolbar, click view and choose "Normal Edit Mode"

CREATING A WEB SITE FOLDER
As you design a web site, it is important that you save all the materials for the site in the same folder. In most websites the file called index.html (or index.htm) is automatically loaded. From there you can include links to other files
BEGIN BY CREATING AN INDEX PAGE
  1. Open Mozilla.
  2. Choose File > New > Composer Page from the top pull-down menu. (or Maybe better yet, find a page on the web you like enough to start from, visit it then choose File > Edit
  3. Give your page a title and identify yourself as the author.
    • o Choose Format and Page Title and Properties from the top menu.
    • o When the page properties box appears, type a title for your page, type your name in the author space, and provide a short description of the page if you would like.
    • o Click OK. You should now see the page title in the top title bar (it will appear this way on webpage browsers as well).
  4. Save the file.
    • o Choose File and Save as from the top menu.
    • o Name the file index.html
    • o Save it into your Web project folder (public_hml).
    • o When the page returns to view, you should see index.html designated as the filename in the top title bar.
ADD AND ALTER TEXT’S FONT TYPE, COLOR, STYLE, AND ALIGNMENT
  1. Type some basic info about you and the page in the upper left corner.
  2. Highlight this block of text by right mouse-clicking and scrolling over text.
  3. Choose Format from the top menu to set the font type, size, color, style, and alignment—or use the formatting toolbar.
ADD AN IMAGE TO YOUR PAGE
  • • Finding Images with a Google Search
    1. Open Internet Explorer or Netscape Navigator.
    2. Go to “www.google.com.”
    3. Click on the Image tab.
    4. Perform your search.
  • • Copying images to Your Website Folder
    1. Right-click on the image you wish to copy.
    2. Select Save Image As from the menu that pops open. Save the file to the public_html folder in your student folder.
    3. Select a name for the image that will serve as a memory aid. Do not change the file extension.
  • • Adding Images to Your Index Page
    1. Move the cursor to where you want your image on the page.
    2. Click on the image icon on the icon toolbar or choose Insert and Image from the top menu. An image properties box will appear.
    3. Click Choose File and select the image you have saved to your Web project folder.
    4. If desired, you may add a description. In the alternative text line, type in a short description of the picture, and click OK. This description has two purposes: it will appear when the cursor is placed over the image or if for some reason the image does not appear on someone’s browser.
CHANGE THE COLOR OF YOUR PAGE
  1. Choose Format on the top menu.
  2. Select Page Colors and Background.
  3. Select Use Custom Colors.
  4. Click on the box next to each page feature to change its color.
  5. Click OK.
ADD A LINK
  1. Highlight the text you wish to link.
  2. Click on the link icon on the icon toolbar or choose Insert and Link from the top menu.
  3. In the Link Location box, you have one of three options:
    • • For an external link, type in the URL of the page to which you want to link (for example, http://www.uccs.edu). Choose Advanced Edit. In the drop-down menu next to Attribute, choose “target.” Select “_blank” in the Value box. Click OK. This coding will allow all links external to your page to open in a new browser window.
    • • For an email link, type the following, with your email address in place of the sample: mailto: YourUCCSID@uccs.edu.
    • • For an internal link, type in the filename (for example, links.html).


Publishing Your Webpage

There are two ways to publish. The first uses ftp, so (for security reasons) it should only work from campus (including the dorms or VPN access). But it is a lot easier,especially with images. Do do this click the "Publish button" and fill out the 2 tabs (see images below, where you need to replace tboult with your user ID. Pay attention to case and all the directories, e.g. note one line is ftp and has public_html the next is http. Also note that if, as I did in the second image, you tell it to save the page as inedx.html (as opposed to the correct index.html it will run but you will not see the right files. Finally check the box telling it to translate the images and copy thim into the same direcotry.

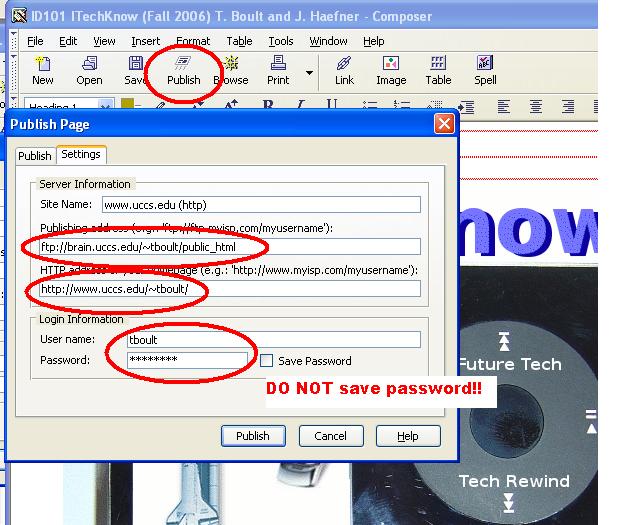
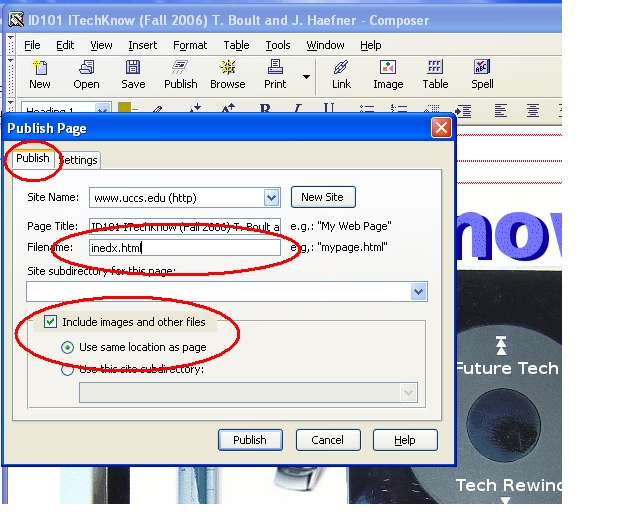
You also publish (from anywere, with files from any editor) by uploading the contents of your Web project folder, public_html , to the public_html folder on your brain.uccs.edu account via SSH Secure FTP

  1. Double-click the SSH Secure File Transfer icon on the desktop. You may also access this program by selecting SSH Secure File Transfer from the Start menu.
  2. A blank divided window will appear. Click on the Quick Connect icon or choose File and Connect from the top menu. The host name should read brain.uccs.edu Type in your UCCS Net ID in the User Name space and click the Connect button. Enter your password when prompted and click OK.
  3. Check the file transfer settings by choosing Settings from the Edit menu. Under the Global Settings options, choose File Transfer and Advanced. The Preserve Original File Time box should not be checked. If it is, deselect the checkmark.
  4. A list of folders in your Dante space will appear in the left-hand window. A detailed list of folders and files will appear in the right-hand window. Click on the public_html folder—this is the folder you want to upload all web sites to.
  5. In the public_html folder, create a folder for this website (e.g., public_html) by clicking Operation > New Folder. Click on your newly created folder to open it.
  6. To upload, choose Operation and Upload from the top menu bar. You can also click the icon on the icon toolbar. An Upload box will appear.
  7. Use the black arrow to the right of the Look in space to find your Web project folder on your computer.
  8. Click on the Web project folder, and then click on the Upload button. A box will appear indicating that the folder and all files are being uploaded. If you are uploading a new version of the folder, a box will appear asking if you want to overwrite files in the old folder with the new versions. Click Yes to All.
  9. To disconnect, choose File and Disconnect from the top menu bar, or click on the icon. To quit, choose File and Exit from the top menu bar. If you deselected the Preserve Original File Time box when you checked the settings, you will be prompted to save the new settings.
  10. To view your web site, type in the following URL, substituting your UCCS Net ID and folder name where indicated: http://www.uccs.edu/yourUCCSNetID
  11. If you don’t see your page, check your spelling. If the page still doesn’t appear, go back to SSH Secure FTP to make sure that you’ve uploaded the public_html folder to the public_html folder.


Composer Quick Reference Guide


Command
Tool bar
Menu
Shortcut key
New Select New Composer Page from the File menu Ctrl + Shift + N
Open Select Open File from the File menu Ctrl + O
Save Select Save from the File menu Ctrl + S
Preview Web Page   Select Preview from the View menu, or from the tab at the bottom of the Composer window. N/A
Print Select Print from the File menu Ctrl + P
Check Spelling Select Check Spelling from the Edit menu Ctrl + K
Insert Image Select Image from the Insert menu N/A
Insert Horizontal Line Select Horizontal Line from the Insert menu N/A
Insert Table Select Table from the Insert menu N/A
Insert Link Select Link from the Insert menu Ctrl + L
Insert Anchor Select Named Anchor from the Insert menu N/A