PROJECT BACKGOUND (VIDEO SURVEILLANCE CAMERA)

This research work is part of ongoing project by Dr Boult, The El Pomar Endowed Chair of Communication and Computation in the Computer Science Dept, UCCS. He was the Chief Technology Officer (CTO) of Guardian Solutions Inc when the project was started. The project, however, is done entirely using university funds.
The objective of the project was to develop a portable low-power video surveillance system – a very advanced network camera. This camera will run the complete Guardian WATCH software, doing advanced video-based detection, analysis of the targets 3D properties and motions. It also provides geographical location of the target, control of the camera to follow targets and provides a packetized network video stream. Later releases will support simultaneous stream Mpeg4 video and Guardian WATCH detection tracking. It also supports generic video software such as various linux-based open-source public domain surveillance software such as “motion” or “elvis”.
This page is about the effort needed to develop a small a standard distribution based Operating System to support the system.
The surveillance system consists of a PanTiltZoom (PTZ) camera and an embedded computer. The system is currently based on a HS1600 SBC Transmeta Crusoe Mini Board with a PTZ camera from Rvision.
The various phases of this project are
Linux is an open source operating system. Debian is one of the popular flavors of Linux available in the market. The other popular flavors of Linux available are Red Hat, Mandrake, SUSE, Slackware etc.
- FEATURES OF DEBAIN
Debian is a very stable OS. The advantage of using Debian is that it does not specify any minimal package selection. Instead it gives freedom to choose one’s own choice of packages to be installed. This helps in the pursuit of obtaining a small OS.
One of the attractive features of debian is the apt-get function which is very useful in updating or installing packages. When apt-get is used to install a package, it also installs other packages that are dependent on the package being installed. Debian has also a reputation for being quick to release security patches.
Useful Sites:
Working on OS — Making changes to OS
- PROCEDURE
The package list provided by Debian is very exhaustive which gives the installer the freedom of selection.
STEP 1
Debian was first installed on a hard disk. The total disk space used after the initial installation was 120 MB.
STEP 2
In order to reduce the size of OS, unnecessary packages were removed. This lead to an OS only with essential packages installed. The documentations were the next to be removed. With the removal of the most of the documentation, the OS size was down to 77 MB.
STEP 3
The last step was the use of a script obtained from the internet which would trim the size of debian to much smaller levels. After running the scripts the size of debian was down to an amazing 50 MB. The scripts were obtained from Karl Hammar at Neohapsis Archives.
Useful Sites:
HARD DISK PARTITIONS

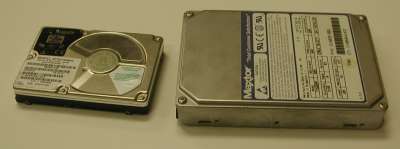
The hard drive used was 2 GB . It was also a laptop hard drive for concerns about amount of physical space it uses. It was partitioned to accommodate various size of debian.
SLIM — 128 MB partition — 50 MB OS size
FAT — 128 MB partition — 77 MB, acted as base for generating OS on SLIM
SWAP –128 MB
FULL — Used rest of the memory available. It was used as testing ground.
This arrangement of having various partitions was beneficial. An OS or a piece of software changes over a period of time due to changing needs of the customer or security updates. With multiple copies of the OS present on one hard disk, it would facilitate benchmarking performance of each under different configurations against others. When a change had to be made, it was done to the FAT which would then be used to generate the SLIM by using the scripts.
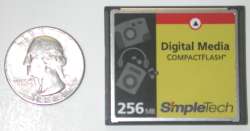
The next phase of the research involved the selection and testing of various storage devices to be used with the embedded system. Storage devices that were considered were as follows:

- ADVANTAGE OF DOC
- They don’t need any kind of adapter as they are plugged into the motherboard directly.
- They are very durable.
The Linux kernel was first configured to support DOC. This was done by changing the options for MTD (Memory Technology Devices) settings.
CONFIG_MTD_DOC2000=y
CONFIG_MTD_DOCPROBE=y
View the entire Kernel .config file.
The kernel was built to enable all the kernel settings. The commands used for this were.
$make clean;
$make oldconfig;
$make dep;
$make install;
$make modules;
$make modules_install;
Make clean — makes sure that there are no stale *.o files.
Make oldconfig — keeps the old configuration settings and shows any sub options that are associated with the new module that has been enabled.
Make dep — makes all the dependencies.
Make install –Installs the kernel
Make modules & make modules_install — builds all the modules and puts them in the /lib/modules/2.X.VV after erasing what is there.
We tried to install Linux on DOC but ran into problems. We could not find solution for the problem even after working hours on it. The solutions that were provided on the internet also didn’t help. So finally it was decided to discontinue with DOC as we were facing problem and it is not economic. Disc on Chips are not easily field upgradeable, therefore we discontinued working with them. A 144 Mb DOC costs $170 whereas a 256 Mb flash card costs $60.
Back to Storage Devices Top of Page

- Advantage of Flash Card
- They are less expensive compared to DOC.
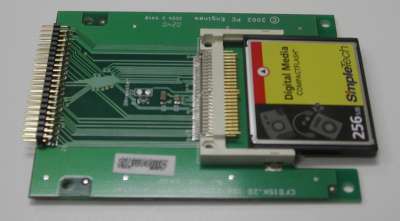
- They are portable, as they can be used with an IDE adapter with any computer. The cost of the adapter and flash card combined is less than a DOC.
- They are field upgradeable. An OS and software both change over the period of time depending on the need of the customer and the latest security patches that have to be applied in order to tackle the new security issues. Therefore the changes can be made and the latest version of OS or software and then shipped to the customers.
- Disadvantage of Flash Card
- The number of read – write is limited to 100-300 k which is less than a hard disk.

For using a flash card no changes have to be made to the kernel. Only an IDE adapter has to be used.
In order to protect the flash card from unnecessary read – writes RAM disk was used to store the data.
Back to Storage Devices Top of Page
Random Access Memory(RAM) is a fast read write memory. As the name suggest the RAM can be used as a hard disk to store data. The premise for using a RAM is that it would save the flash card from wear and tear caused by frequent read/writes. All the temporary data would be written on RAM and only necessary data would be written on the flash card.
Initially a RAM disk was created. This was done by
$ mke2fs /dev/ram0
A mount point (/mnt) was specified by
$ mount /dev/ram0 /mnt
For using the RAM as a disk, kernel settings were changed to support it. The default size for a RAM disk is 4096 k or 4 MB. This was also changed to the size of the kernel image. The kernel settings for RAM disk can be found under the heading of block devices.
CONFIG_BLK_DEV_LOOP=y
CONFIG_BLK_DEV_FD=y
CONFIG_BLK_DEV_RAM=y
CONFIG_BLK_DEV_RAM_SIZE=140000 // Maximum RAM disk size.
CONFIG_BLK_DEV_INITRD=y
Kernel was built after the new modules were added.
In order to boot from the RAM disk a kernel image was created.
$ dd if=/dev/zero of=ramdisk.img bs=1024 count=140000
NOTE — The file created above is empty.
The file just created is now mounted and then everything on SLIM is copied over to this file.
After everything is copied over to ramdisk.img, the file is unmounted. To save disk space the kernel image is compressed by using gzip utility. The fstab file determines the order in which the file systems are checked during initial booting of the system. Therefore the fstab file was appended, to check the file system on the ram disk. This also helps in defining the mount point for root. The following lines were appended to it.
$ /dev/ram0
In order to boot from a ram disk, the following lines were added to lilo
image=/boot/vmlinuz
label=RAM
read-write
initrd=/slim/slim.gz
append=”root=/dev/ram0″
ramdisk=136250
Useful Sites:
Back to Storage Devices Top of Page
Xawtv is a TV application for the bttv driver. It supports both v4l1 and v4l2 interfaces. Bttv is a Linux driver for TV cards based on the bt848 and bt878 chips. It also contains various command-line utilities for grabbing images and AVI movies, tuning in TV stations; etc .Due to these features xawtv is an important application. It helps in grabbing images through the camera.
The following changes were made to the kernel configuration file for xawtv:
# Video For Linux
CONFIG_VIDEO_PROC_FS=y
CONFIG_VIDEO_BT848=m# Console drivers
CONFIG_VGA_CONSOLE=y
CONFIG_VIDEO_SELECT=y# Frame-buffer support
CONFIG_FB=y
CONFIG_DUMMY_CONSOLE=y
CONFIG_FB_VESA=y
CONFIG_VIDEO_SELECT=yCONFIG_SOUND=m
NOTE: It is important to enable the sound option even if you don’t intend to use it.
In due course of time new modules would be added to the kernel based on the features added. So watch this space for the latest updates on PVCS.
Useful Sites:
