 IQEye3 Setup
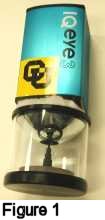
 The IQEye3 is a network camera which can record images up to 1288×968 on a remote FTP server. The lenses used with this camera is an omnidirectional lense from Remote Reality which will allow the camera to see all 360 degrees around it. This camera should be mounted in a downward orientation, the lense points down (see Figure 1). This camera should also be mounted so that it can see as much as possible (not in the middle of the vehicle) also the higher the camera can be mounted the better. The CU sticker should be visible from the front of the vehicle.
Watching the Video
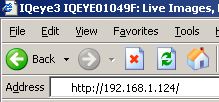
 In order to view the live clips from the camera you must Have a java enabled browser. Then simply go to the camera’s IP (default 192.168.1.124) address in your browser. Please note that the image you will see will look like a dohnut. Thanks to Remote Reality we are able to use their lense and through their netvision 360 software we are able to see all the way around the camera without any moving parts.
Recording the Video
 To record video use the “Quick Jump To…” pull down to select “Recorder Settings” the user name is “root” and the password is “system” then click on the “Start Recording” button to start recording. To stop recording use the same steps except the button will now read “Stop Recording.” Use this user name and password carefully it is possible to render the camera useless.
Changing the Amount of Storage Space
 It is possible to change the amount of storage space the camera uses to record its video on. The max storage space of this particular little blue server is 10Gb. To change this setting use the “Quick Jump To…” pull down on the camera’s web page to select “Recorder Settings.” About half way down the page on the right hand side you will find a “storage limit” section simply change the value in the “max storage(GB)” field to your value, you should then see in the upper left hand corner of the page words flash on the screen saying sending, waiting, and complete you must watch fast to see these. If you do not see this the settings have not been saved, try moving the curser to a different field on the page.
Setting the IP Address
To change the camera’s IP address download and install this application on a computer running Microsoft Windows (this is only necessary to change the IP). Run the program, from the action menu click “Assign IP Address” select “all devices” and click next. Select the device from the list and continue following the instructions from the wizard. It is also possible to change the IP of the little blue server for the camera to do this you must be able to log into the machine as root and have an understanding of how to change IP addresses in Linux. If you change the IP of the server you must then reconfigure the camera. You must reconfigure the settings on the recorder settings page.
More advanced Features
It is possible to adjust image brightness (along with other attributes), the IP address, the name of the camera, and the address which the camera records to please contact tboult@cs.uccs.edu for more information.
